
Blog Post Checklist to Rank Locally
If your business is spending time and effort on writing blog posts to drive traffic, there are some key elements your blog needs to have.
This checklist is designed for local businesses who want to attract LOCAL traffic, instead of general blog posts that may attract traffic from other states or even other countries.
Pick Your Keyword Phrase & Synonyms
First, decide what Keyword Phrase you want to focus on for the blog post.
Your Keyword Phrase is the Keyword + Tails (words that make it more specific and being specific is good when you’re a small local business). You’ll use and repeat that keyword phrase throughout your blog in key spots. Try and get those words in the same sentence but it doesn’t have to be in the same order.
Also use the Keyword Synonyms interchangeably throughout the blog post to help switch it up and to help people searching for similar words related to your keyword to find you.
Write Your Headers
I find it’s helpful before I event write my blog post (or use AI to help me) to write out my headers in advance. Not only does this create a handy outline for your blog post, but it also helps you make sure you are including your keyword and city/locality in several of your headers.
Google scans the headers in your blog to see if it has the right keywords for a search query. So if you’re weighing the importance of what will help you rank, know that headers are critical.
Where to Include Your Keyword + Locality:
In Your H1 Header: You should only have one H1 header and it should be the headline at the top of you blog post. It’s critical this H1 headers has both your main keyword AND your city/locality.
In at Least One H2 Header/H3 Header: You don’t need to include your keyword and city in every header. In fact, you shouldn’t because it can be perceived as keyword stuffing and can hurt your ranking by Google. Instead, sprinkle your keyword phrase and your keyword synonyms in multiple headers.
Write in 2nd Person
Talk directly to reader, saying “you will...” instead of “clients will...”).
Word Count Should be at Least 500 Words of Useful Content
In the age of everyone using AI to write, there’s a lot of trash writing out there. And if you write trash copy and then your visitors come and get turned off, they’ll hop off and move to a different website.
Poor Content Can Affect Your Ranking
Google is tracking user behavior and uses it to determine how to rank you. If Google sees your blog posts aren’t actually helpful and people are quickly leaving your site, it can hurt your rankings.
Instead, make sure your blog post has useful, informative copy that makes people want to read it, share it, and reference it.
Choose Quality over Quantity
In this case, quality matters over quantity. I’d rather see you have 1 quality blog a month over 10 crappy AI blog posts a month, and you’ll see the difference in your traffic.
That’s not to say don’t use AI. I use AI as an aide to my writing. I keep what I like and throw out what I don’t, but I always add my own insights and twist to it.
Break Up Long Paragraphs and Sentences
No one wants to read one big long chunk of text. Make your blog easier to scan with these tips:
Break up big paragraphs into small paragraphs (3 sentences or less) so it’s easier to read.
Make your sentences short and sweet.
Got a list? Use bullet points or numbered lists whenever possible.
Can you break up a large paragraph into smaller sections with headers? Do it!
Add images or videos to add visual interest.
Sprinkle Keywords and Your City Through Your Paragraph Text
Outside of headers, you should have your keyword phrase and its synonyms sprinkled throughout your blog. Not in every sentence! Shoot for including it once every 1-2 paragraphs.
Include at Least One Image
Use your photos, a design from Canva, or a free image from a free image site like: Unsplash, Pixabay, Pexels, and pikwizard. Most website platforms have a free image library to choose from.
Photos should be saved as a JPEG and graphics should be saved as a PNG.
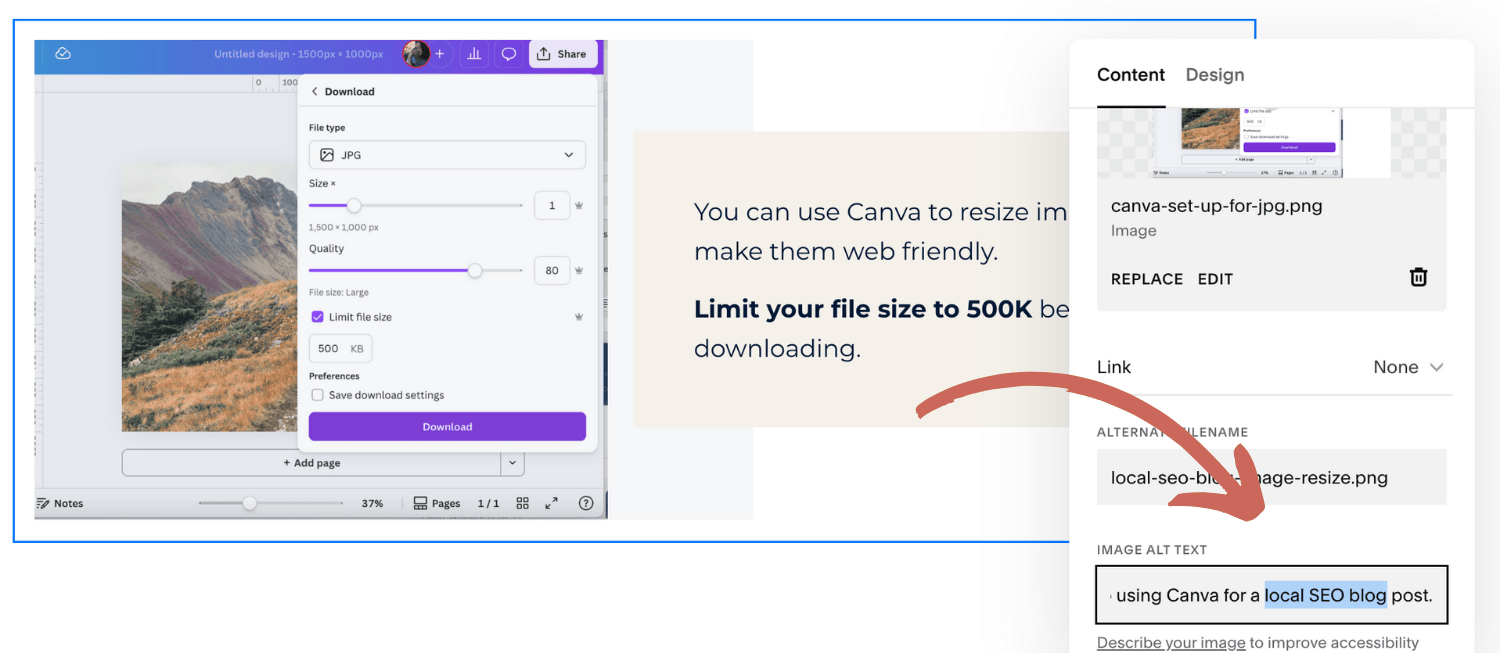
Check the image size. Big files make your page SLOW. Make sure blog images are no more than 500 KB in size.
If you need to make the image size smaller, you can use Canva. Open a new custom size design (set size to 1500x1000 pixels), upload your image onto the design.
Click Share > Download > Limit file size to 500K>Download.
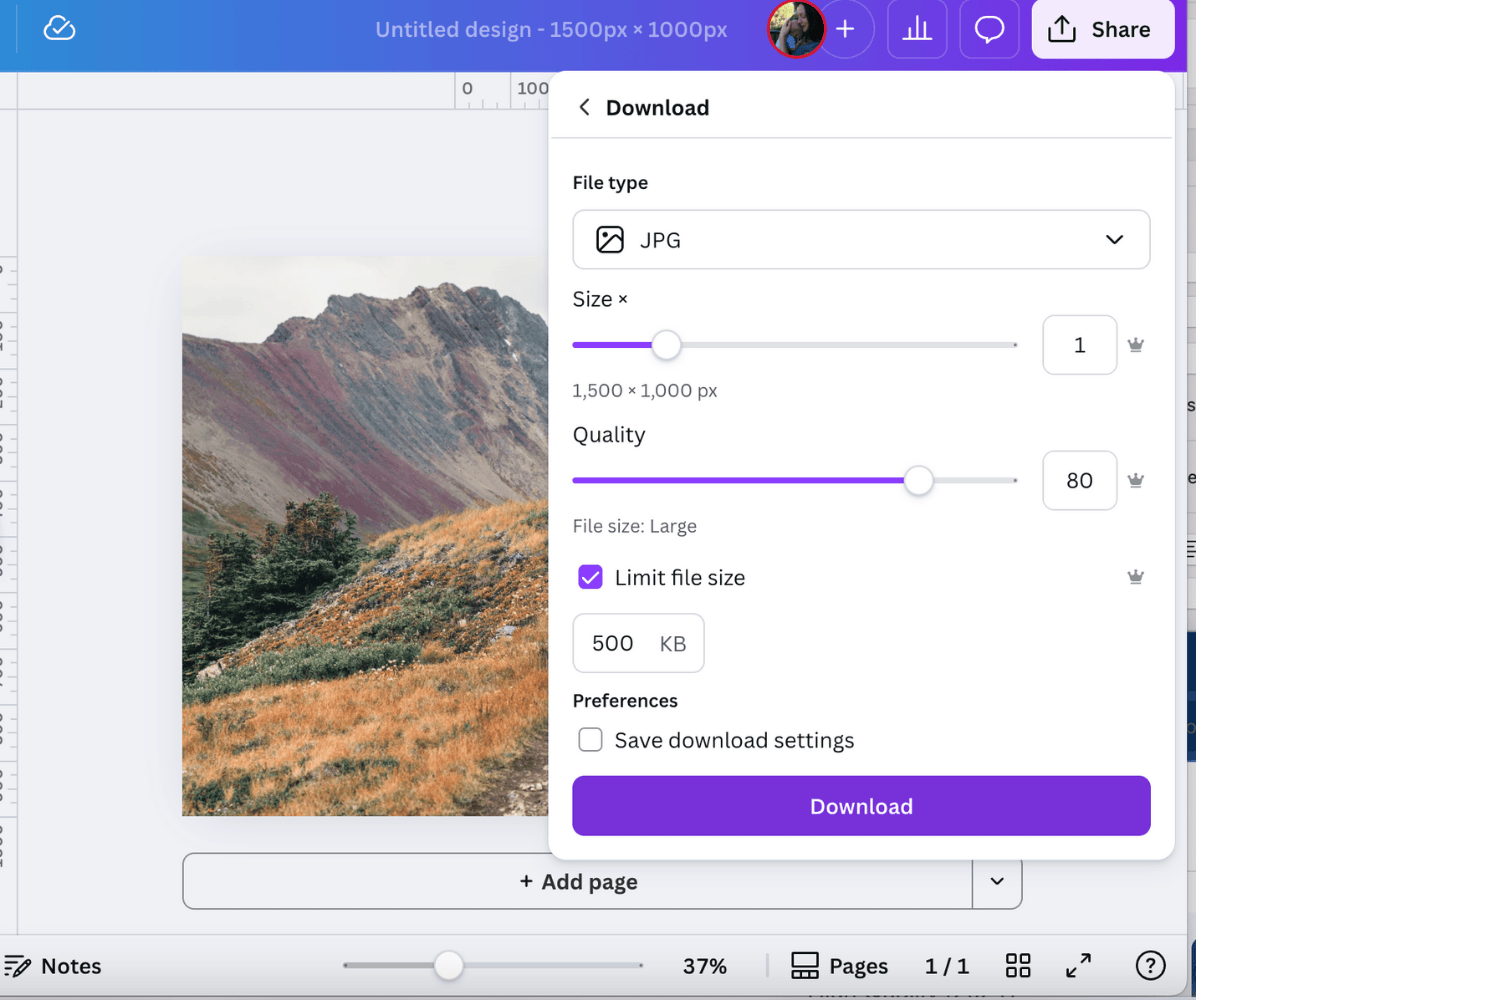
You can use Canva to resize images to make them web friendly.
Limit your file size to 500K before downloading.
Rename the image before you upload it. Rename the image and save it to your computer before you upload it to Squarespace to include the keyword phrase.
Put images UNDER the headers. The should go: Header, Image, body of text.
Edit your Image and Add Image Alt Text: Include your keyword. This is both about accessibility and it helps Google understand what the photos is about and can help your blog rank. In the image below, I’ve edited my photo and added my keyword to the Image Alt Text.
Include at Least 1 Internal Link (Bonus: Use 3 Internal Links)
An internal link takes people to another page on YOUR website. It can be another blog post, your contact page, an about page, etc.
This helps Google understand how your pages are related, and it’s helpful to your readers. If your blog post performs well and drives traffic to it, then it can help any pages you link to rank better as well.
Bonus points if the anchor text (what you add the link to) is a keyword. Do NOT use empty words as your anchor text (what you add the link to) such as “this page” or “learn more here.”
Include at Least 1 External Link
An external link takes people to a webpage OUTSIDE your website. There is some debate on whether this really helps SEO, but if you can link to citation or reputable source, it makes you appear like a more credible source as well.
Make sure any external links you add are set to open the website on a new tab and not in the current window.
SEO Settings: Make Your URL Slug Your Keyword Phrase
In your SEO settings for this blog post, write a custom URL Slug (the webpage URL for your blog post) that includes your specific Keyword Phrase. Keep it short and sweet.
Use a hyphen “-“ not an underscore to separate words
Example: https://www.wellcraftedcomms.com/blog/local-seo-blog-checklist
SEO Settings: Write a Page Title that includes Keyword phrase + City/Locality
This is is one of the most critical steps for your blog post! This carries a ton of weight for SEO and it’s what readers see in Google search results as those blue links.
Make sure you include your Keyword Phrase and your city or locality in the page title.
SEO Settings: Write a Meta Description
Your Meta Description is what shows up in google search results under the title. It doesn’t affect your SEO at all, so you don’t need to worry about including a keyword. BUT, it is what people scan to see if they want to click on your blog post, so write an enticing description. Keep it under 160 characters.